This post describes how to move SharePoint 2013 SP1 OnPrem server SQL content databases from SQL 2012 to 2016. This means that there is no upgrade involved, only a move to a new SQL Server. It worked really well. Even if I read lots of articles that it is not supported to run SharePoint 2013 on SQL 2016 it does work if you follow the steps below.
Step 1 Check the Health Analyzer in SP
This is an on prem server and the customer does not have an active SP admin, so I wanted to make sure the server was in a fresh state. I checked the messages in Health Analyzer and noticed that there was an Upgrade message which I wanted to correct first. All content databases had the message “Database is in compatibility range and upgrade is recommended”. I guess some other administrator had done an update on the server but missed the part with running the SharePoint Config Wizard afterwards. So I did just that, and once the Wizard was completed the messages were gone.

I also checked that the UPS and Search etc was running fine without any errors.
Step 2 Backup and Snapshots
Now that the servers are fresh, do an entire backup of all content databases and take a snapshot before you start, in case you must make a rollback.
Step 3 Document your server configuration
I always document the server configuration before I start any changes on a server, to make sure all services runs with the same accounts and mostly because my memory is really bad and it is easy to forget something. So I take screen shots of the Services with the SP accounts that are running, I document “Services on server” inside SP, etc. I also look at the SQL server instance in the “Security” and “Permissions” areas to see what accounts are there and the roles they have. This is important, otherwise you will not be able to connect to the config database later.
Step 4 Verify what content databases that should be moved
Do not move over old databases, keep the servers fresh and without old data. So I checked what databases to be moved. I discovered that there were two Config databases, so only one of them should be moved into the new SQL server. Also, some “test” databases were there for old web applications that no longer was in use. So only move the databases that you actually use. You can see a list of which databases that are in use, if you go to “Upgrade and migration” in Central Administration and click on “Review database status”. There are all the content databases listed that SharePoint uses.
Step 5 Setup the new SQL server
Make sure all accounts that are used on the “old” SQL server are setup the same way on the new SQL server instance. Check dbo, security roles and permissions. You may have to select the dbo account in “Permissions” and check what roles it has, like “Connect to databases” etc. Then select the service accounts, they may have a different role setup.
Step 6 Stop the SP services
Now stop all SP related Windows Services on each SharePoint server in your farm. Do it in this order (thanks to Dan Holme and his article about moving databases http://sharepointpromag.com/sharepoint-administration/simple-guide-moving-sharepoint-content-databases-new-server):
SharePoint 2013: W3SVC, SPSearchHostController, OSearch15, SPWriterV4, SPUserCodeV4 (was not running), SPTraceV4, SPTimerV4, SPAdminV4, FIMSynchronizationService, FIMService, DCLoadBalancer15 (disabled), DCLauncher15 (disabled)
Then, open a command prompt with Run As Administrator, and enter the command IISRESET /STOP
Step 7 Detach databases on the source SQL server
In SQL Server Management Studio, right-click each SharePoint database (the ones you decided to move), point to Tasks, then click Detach. In the dialog that appears, click OK
Step 8 Copy databases to the target SQL server
We did not move the databases, but copied them to the new SQL Server. You’ll need both .mdf (database) and .ldf (log) files.
Step 9 Attach databases to the target SQL server
In Management Studio on the new SQL server, right-click the server or instance, then click Attach. In the dialog box, click Add, then select one database. Click OK to finish attaching the database. Repeat for all databases.
Step 10 Reassign the DBO of the databases
This is an important step. If you don’t assign the correct security roles, permissions and dbo to the databases the connection will fail from the SP server. When you attach databases to the target SQL server, your user account becomes the DBO of the databases so make sure you assign that back to the Farm Account.

Step 11 Create an Alias on the SharePoint server
You can now shut down the “old” SQL Server to make sure this step below really works.
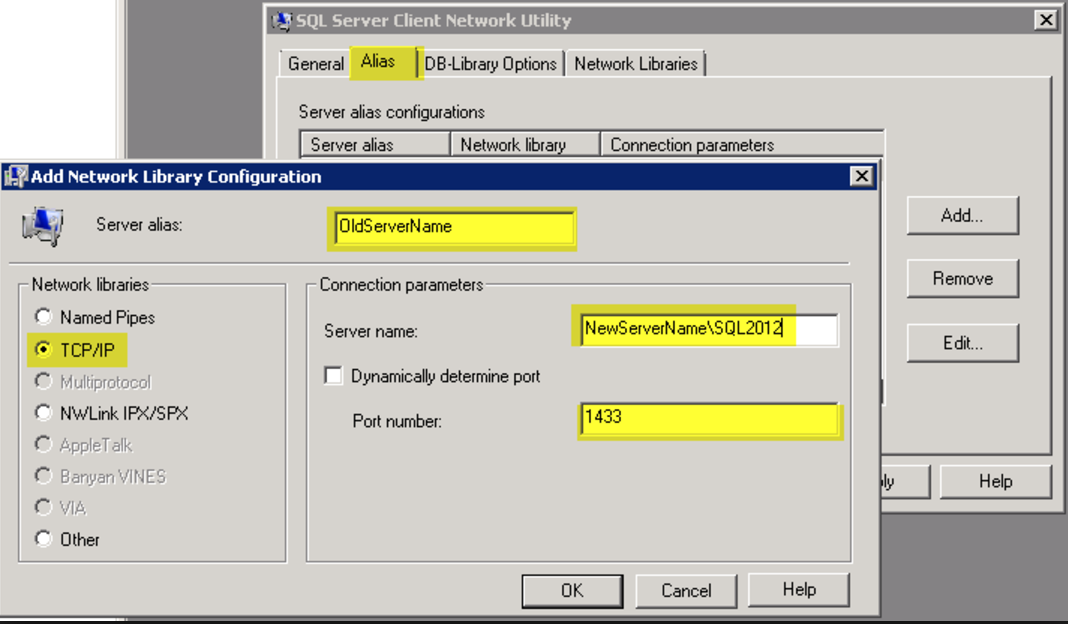
Now we will force the SharePoint servers to use the new SQL Server instance. To do this, we will add an Alias in CLICONFG.EXE so run that on the SP server. Click on the tab “Alias”, and then on “Add” (if it is empty, which it was on my server. If not, then “Edit”). Do the setup according to this image, it is self explanatory. Very smart actually. It may take a while before this connection works, so maybe restart the “Browse SQL” service to refresh that and if you have done all steps above correct, it should work as soon as you have done the last step below. The alias is used to redirect the connections from the original source SQL server to the new SQL server. Repeat this on each and every SharePoint server.
NOTE: Do NOT forget to add the SERVER INSTANCE after the SQL Server names (on both the original and the new target SQL servers) otherwise the connection will fail.
Step 12 Start the Windows Services SharePoint services and IIS
Start the SharePoint services in Windows Services again on each SharePoint server. They should be started in the reverse order from how you stopped them.
So on SharePoint 2013 start them in this order: DCLauncher15, DCLoadBalancer15, FIMService, FIMSynchronizationService, SPAdminV4, SPTimerV4, SPTraceV4, SPUserCodeV4, SPWriterV4, OSearch15, SPSearchHostController, W3SVC,
Then start the IIS by running as an admin: IISRESET /START
Step 13 Start Central Admin and fingers crossed 🙂
Check that Central Administration fires up, if you are lucky – then all is back up again! Also make sure that all service applications like UPS (I always have to start that service manually from within SharePoint CA), Search etc are up and working. For me, all this was working as before. And last but not least, make sure all your sites are running!
Step 14 Reboot the SP server/s
This is maybe not necessary but I always do this to make sure that everything really runs… I reboot the SP servers one last time to be certain. And – all running fine after that too 🙂
Done!
How is this moving to a SQL cluster?
It’s just moving to another Server, but for sure cluster sounds better.
But for those who understand clustering, this is a fail.
Thanks Thomas, you are absolutely right! I do have an answer to why I started writing this blog post as a move to a SQL cluster (my customer expressed it that way and then I never changed it). Thank you for correcting me!